Favourite Quote

Every artist was first an amateur. - Ralph Waldo Emerson The more difficulties one has to encounter, within and without, the more significant and the higher in inspiration his life will be. - Horace Bushnell

Tuesday, April 10, 2012

Getting started with WebDriver C# & Visual studio


With new changes in work environment & Agility comes change in technology & moving on from your usual traits

To explore & challenge yourself with new paths.. Ahh am going to philosophical :)

Let's get started with WebDriver C# - It took a while for me to move from jars to dll's, API's to

Assemblies,Packages to namespace ...But must say have gone past the initial hiccups..

It looks all well now, Hence blogging my experiences :) as i could hardly find any help on C#.

List of Things to do before plunging in :

1. Download webDriver for .NET from http://code.google.com/p/selenium/downloads/list

2. We have licensed Visual studio ultimate 2010 as IDE,If you don't have one you can download Visual studio Express

3. You can either write in NUnit framework or in Microsoft's Test tools in Visual studio

4. Download Nunit from here based on the operating system you are in

http://www.nunit.org/index.php?p=download

5.
automationwithselenium.blogspot.com-Google pagerank and Worth

Thursday, March 8, 2012

Microsoft's SilverLight Plug-in


Microsoft's SilverLight Plug-in:
Silverlight is a powerful development that comes with Rich Internet Application ,how does it impact testing.
Challenge for a tester is object identification :
Though it is cross browser compatible it is hard to identify objects with the usual selectors
FireBug
IE developer
Debug bar

Solution is :
SilverLight Spy
This is Opensource tool for identifying UI elements that are developed in SilverLight with limited features & commercial with full features.
Here is there official link : http://firstfloorsoftware.com
Screen shot -1 : Displays the Where to enter url

Screen shot -2 : Displays How to use the UI element selector
Tabs of Properties,View,Statistics(Am not sure how we are benefitted with this
automationwithselenium.blogspot.com-Google pagerank and Worth

Thursday, March 1, 2012

Writing our first script in WebDriver


Prior to getting started with writing scripts ensure that you have completed your installations & you have identified which framework you would work with

I have chosen to write the test in JUnit Framework , Where Eclipse is my IDE & Selenium 2.

Here is a basic script for search on an amazon site.

Objects that are dealt are :

1. Drop down list

2. Text box

3. Button

4. Link

Actions performed are :

1. Am selecting a value from drop down list

2. Enetering text in the text box

3. Clicking on the button.

4. Clicking the link that meets my partial text of the url's fetched


import org.junit.Test;

import org.openqa.selenium.By;

import org.openqa.selenium.WebDriver;

import org.openqa.selenium.WebElement;

import org.openqa.selenium.firefox.FirefoxDriver;

public class Search {

@Test

public void testSearch(){

WebDriver driver = new FirefoxDriver();

driver.navigate().to("http://www.amazon.co.uk/");

WebElement dropDownsearch = driver.findElement(By.id("searchDropdownBox"));

dropDownsearch.sendKeys("Electronics & Photo");

driver.findElement(By.id("twotabsearchtextbox")).clear();

driver.findElement(By.id("twotabsearchtextbox")).sendKeys("Sat Nav & Car Electronics");

driver.findElement(By.id("navGoButton")).click();

driver.findElement(By.partialLinkText("Satellite Navigation System")).click();

driver.close();

}

}
automationwithselenium.blogspot.com-Google pagerank and Worth

Tuesday, February 28, 2012

Getting started with Installation of WebDriver - Java Client


With SELENIUM / WebDriver being most cost effective tool for functional testing these days most of the companies are embracing this open source tool.

Let's get started with installation of WebDriver & configurations as required.

1. Download from the official website of selenium http://code.google.com/p/selenium/downloads/list

1.a Have a look at the screen shot


2. We have downloaded Selenium-2.20 version for java & selenium-server-standalone-2.20.jar was the latest when i wrote the blog

3. I am on a Windows 7 box - Create a dierctory called Selenium & have the downloaded selenium extracted. I have mine within Eclipse as i would use that as my IDE ,placed it within Eclipse for it would be easy mapping the library files a.k.a jars

This is how it would look ,folder structure & files.


Now that we have our Selenium 2 downloaded we need to have java on our box let's get that.

4. Download java from http://www.oracle.com/technetwork/java/javase/downloads/index.html

5. After you are done with installation of java to verify just go to where it is installed & check for version of java

6. Have a look at the screen shot


7. Now that we have jdk , selenium we need an IDE which is Eclipse in our case

8. Download Eclipse from there official website http://www.eclipse.org/downloads/

9. We are all set with downloads that are required to get started,Let's get to configuring as appropriate

10. Click on the eclipse.exe

11. Create a Java Project : Click on File > new > Java Project

12. Give a name to the Project as appropriate

12. Right Click on the Project name within the Project explorer window & click on Properties >> Click on Java Build Path

13. Look at the screen shot.

Screen shot 13


14. Click on Add external jars , now add the selenium-java-2.20.0.jar that we downloaded earlier

15. Again Click on Add External jars,now add the lib folder of C:\selenium-2.20.0\libs

Once you have added all your jar's it shoudl look like above screen shot 13 at step 13

16. Let's also add JUnit jar's as our framework is written in JUnit

17. Click on Java Build Path > Add Library > Will show a list of libraries just like the below screen shot

screen shot 17


Choose appropriate JUnit version

We are now done with our installations and configurations required for selenium-2,junit,java,eclipse
automationwithselenium.blogspot.com-Google pagerank and Worth

Regular expression Extractor - Testing ReCaptcha with JMeter


Most often these days every website that accepts payment want's to add additional security of having ReCaptcha inplace.

It is definitely a challenge to test reCaptcha without turning it off, but allowing to accept same password as against dynamically generated one.

So here's how i load tested reCaptcha using JMeter.

1.It is important that we know how to use the regular expression extractor,So that we retrive params from one request and pass them to another request.

2. Add a HTTP Sampler

3. We need to add Regular expression extractor which is required to retrive values from the response of the previous request. Therefore it would be a post processor.

3.a Right click on the HTTP Sampler > Add > Post Processors > Regular expression Extractor - see the screen shot


3.b Now the Regular Expression Extractor is added have a look at the screen shot,Let's have a closer look at it :


3.c Give appropriate name just like i have given ,It is however optional giving a name will help in debugging issues if it exists

3.d Apply to : leave this to default or choose as appropriate to your requirement

3.e Response Field to check : Leave this to default or choose as appropriate to your requirement

3.f Reference Name : Give a appropriate name here this act's as a variable that stores value retrieved from teh Regular expression

3.g Regular Expression : "params":"(.+?)nonce=(.+?)" Let's get to understanding this we are matching all that is after the params : and then matching the value for nonce

The special characters above are:

( and ) - these enclose the portion of the match string to be returned

. - match any character

+ - one or more times

? - don't be greedy, i.e. stop when first match succeeds

4. As i have previously mentioned it is good to add a DEBUG SAMPLER to understand whether right value is being fetched & for debugging purpose

5. Trick to validate your regular expression is :

5.a Add a View Results Tree

5.b Choose RegExp Tester to Validate if you have written the right expression

have a look at the screen shot


automationwithselenium.blogspot.com-Google pagerank and Worth

Wednesday, February 22, 2012

How to build a request dynamically in - JMeter


Most often we end up dealing with how to dynamically build our request.

Also how to fetch values received from HTTP request-1 & pass them as parameters to HTTTP request-2

We can achieve this by writing a simple script within JMeter.
for ex:
Let's take a scenario of amazon where we have to add items to the shopping basket

where items are onsale (These items onsale vary each day)

Therefore we don't want to be updating our data scripts each day

though we are reading from external files.

Let's get started to handle such situation.

1.Within a Testplan add a Thread group

2.Add a HTTP request sampler - This is our request-1

2.a We have to retrieve the item/product id's from this request so we need to add a xpath extractor as a post processor event.

Have a look at the screen shot.

2.b
Add a Debug sampler so that you can verify if the xpath extractor does retrieve the value.

To add a debug sampler right click on the Thread Group > Add > Sampler > Debug Sampler

To view contents of sampler you will have to add Listener.

Right Click on the Thread Group > Add > listener > View results tree


3.Add a HTTP request sampler - This is our request-2

3.aNow that we have retrieved id's from our previous request we need those to send as a request, Hence we need to Pre Process before a request is made.

3.b After adding your HTTP request sampler-2

3.c Right Click on the HTTP Sampler > Add > Pre-Processors > Beanshell Pre processor
Have a look at the figure


3.d Now let's take a closer look at the BeanShell PreProcessor

3.e Give a meaningful name for the PreProcessor just like i have given.

3.f Now add the script where you want to build your request.

int count = Integer.parseInt(vars.get("GET_EVENT_ID_matchNr"));

for(int i=1;i<=count;i++) {

String prefix = "eventInTopPackage[";

sampler.addArgument( prefix+vars.get("GET_EVENT_ID_" + i)+"]", vars.get("GET_EVENT_ID_" + i) );

}

Let's understand what we are achieving in the above script.

3.g Get count of the matched id's that were retrived from Xpath Extractor.

prefix - Is constant/static value

param - Will now have eventInTopPackage[] event_id_value

Have a look at the screen shot how request will look
automationwithselenium.blogspot.com-Google pagerank and Worth

Tuesday, February 21, 2012

How to add a Xpath Assertion in JMeter

As i've mentioned in my earlier posts about how assertions can be of help in validating the right response code

Xpath Assertion eases life when we have to validate if an object exists.

For ex:

Let's again take a shopping cart example.

1.Search for an item
2.Add selected item to shopping cart > now we want to verify if the Add cart button is available on the page.

Therefore we need to add a xpath assertion.

Below screen shot should give a clear idea & how an expression is built.


Let's have a closer look at the Xpath Assertion.

Add a xpath Assertion :

1. Right Click on the HTTP Sampler > Assertions > Xpath Assertions.

Once you'ev added the Xpath Assertion, now we have to add appropriate values so that we can assert object or value.

1. Give a name to Xpath Assertion just like i have given not necessarily same.

2. XML Parsing Options - Check the Checkbox's against "Use Tidy(tolerant parser) & Quiet".

3. Xpath Assertion - contract the xpath & pass the xpath string within the Xpath Assertion.

For ex : I am validating to see if the button with id "bestAvailableTickets_LookForTicketsButton"" exists on that page.

I have left the "True if nothing matches" as unchecked as i want it to match.
automationwithselenium.blogspot.com-Google pagerank and Worth

How to post parameters with request in - JMeter

We most often have to post our request with dynamic parameters or even static parameters,It would be handy if we did find a way to post our parameters.

For ex:

Let's say that :

1.I have a shopping cart as my application

2.I am seaching for a item

3.Adding it to my shopping basket

Assuming that we figured out what are the parameters that we need to pass to the request.

We can use FireBug as a tool to identify what are parameters that are sent with a request quickly (or)
We can use LiveHTTP Headers to do the same functionality of identifying what are variables that are dynamic,static,values/names of the object.


So let's have a closer look at the image above.

1. Add a sampler viz., the HTTP Request give a name to the request just as i have given.

2. Method is "POST" we have different webmethods for each request we do.

3. POST method uses web method which means that you are posting a request to the
server & the response will be sent inturn to the server.

4. To avoid the hiccups we face in future let's parametrise the dynamic content by passing it as a variable either as user parameter or from a CSV file.

5. Click on the Follow Redirects & Use Keepalive so that we can have a look at if there are any redirests that occur.

8. Now let's have a look at the parameters which we have to pass through our request.

9. Make sure you know what the application code rather id for an object is called as,you can find out this by using Firebug or Live HTTP Headers both the name & value.

10.We send the Name Value pair as request so name is the id/name that uniquely identifies an object on the application.

11.It sometimes rather often happens that we don't want to change the values frequently in those scenarios you can read values from a CSV file.
automationwithselenium.blogspot.com-Google pagerank and Worth

Adding Response Assertions


It is often important that we validate the response we receive for every request we had sent to the server.

We can achieve this by adding a response assertion to the sampler.

There are various types of assertions you will have to identify what serves your purpose & work accordingly.

Add a response assertion by right clicking on the sampler > Assertions > Response Assertion - Have a look at the fig1


Now that we have added a response assertion let's have a closer look at the settings & values we are looking for identifying/validating our response.

1.Add a name to teh response assertion so that you know when it fails.

2.Select the radio button Main Sample only - this looks for text you are looking for in the main sampler.

3.Let's select "Text Response" as we are going to validate the same.

4.Pattern of matching - Helps in identifying what operation rules you want to apply a wider search pattern would be "Contains" so that pattern matching ignores the pre & post text & just look for "Pattern String".

5.In Patterns to Test - Click the Add button just below the patterns to test "enter the text you want to validate".


It is that easy ... Adding a response assertion. automationwithselenium.blogspot.com-Google pagerank and Worth

Thursday, February 16, 2012

How to add user defined variables in JMeter at Test Plan level

User defined variables with JMeter can be defined at various levels.

1.At a Test Plan level adding here will result in using the variables across the thread groups it could range from variables to passing the csv file.

Here's the screen shot :


2.At a Thread Group level by adding a pre processor > User parameters.
This is usually used when you want to iterate through 'n' users it is preferred to read from a external file if the data is massive.

However let me show you details on how to add a user,delete a user ,add variable & delete a variable.

When we add at a thread group level it acts global to that thread group & all those samplers within that thread group.


3.Sampler Level by adding a pre processor > User Parameters.

Adding user parameter at sampler level is more like a local variable to that sampler.

It is accessed by right clicking on the sampler >> pre processor >> user parameters automationwithselenium.blogspot.com-Google pagerank and Worth

Monday, February 13, 2012

Using XPATH Extrcator

Xpath plays a vital role when you want to extract value of an object present in one request and pass fetched value on to a next request.

This is more often true when you never know what would be the id in simple terms if the value is dynamic & changes for every request.

Let's take a shopping cart example:


1. When we add items to the cart we never know what forms a cartId,if we have to pass that cartId to the basket.

So let's extract the value of Id by passing a xpath query to search for the name "cartId" - This can be determined either by firebug if you are on firefox or debugbar if you are on Internet explorer.


2.Add a debug sampler so that you will know what is returned in the variable you stored.

3.How do we add a XPATH Extractor to our HTTP request.

3.a Right Click the HTTP request

3.b Click on Add >> Post Processors > Xpath Extractor


4. Let's have a closer look at the XPATH Extractor.


4.a Give a name to the xpath extractor.

4.b Check the Use Tidy and the Quiet

4.c Add Reference name - It is like a variable name

4.d Pass the Xpath query

4.e Pass the default value it will displayed if there is no value being fetched from the query.

GUI View - System / JMeter Properties.

JMeter Properties let's us have a look at the Jmeter.Properties file that is placed within the bin folder of the jmeter installation directory you.

It gives a nice GUI view as against the files being edited.


To have a look at the Property file.

1.Right Click on the work bench.
2.Add Non- Test Elements.
3.Property Display.

Will result in displaying all properties of the JMeter.You can select to view the system properties or the JMeter Properties. automationwithselenium.blogspot.com-Google pagerank and Worth

Sunday, January 29, 2012

JMeter proxy

Most of those who fancy with commercial tools & those feel its cool to have a record & playback functionality so that they don't have to bother to the nitty gritty details of organising which parameters to send with a request,how an object is identified and so forth.

Here are steps to record :

Pre requisite :
---------------
1.Download jmeter from the jmeter.org website am on jakarta-jmeter-2.5

Download :http://jmeter.apache.org/download_jmeter.cgi

User manual : http://jmeter.apache.org/usermanual/index.html

2.Ensure that you are on a jdk version higher than 1.5.

3.Ensure that you set the classpath to bin for both jdk & jmeter.

4.Verify that you have set the classpath correctly.

All right now let's get started recording.

1.Right click on workbench navigate all the way upto HTTP Proxy server as shown in the fig -1


2.Now that we have added proxy server to work bench before we start recording let's make a few tweaks to the proxy server controller follow fig -2.


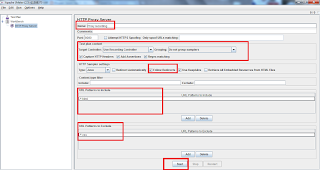
2.a : Add a name to Proxy - It is not mandatory to add a name, Also it is to be remembered that proxy settings will not get saved once you close your test.

2.b : Configure to a port number of your choice or leave to the default 8080.

2.c : Check boxes for Add Assertions,Regex Matching.

2.d : Check boxes for follow Redirects (This helps us capture the redirection).

2.e : URL patterns to include add the resources that you want to include by clicking the add button.

2.f : URL patterns to exclude add the resources that you want to exclude by clicking the add button most often it is the css,js,png,gif(we don't want to get most these load tested).

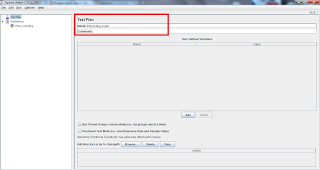
3.Now that we have configured to a Proxy server,let's move on to Test Plan give a name to Test Plan as shown in fig - 3.


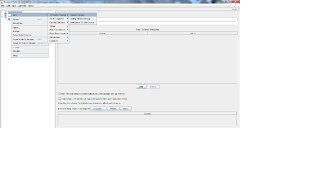
4.Add a Thread group give a name to thread group


5.Now that we have a our test plan ,thread group,proxy settings in place.
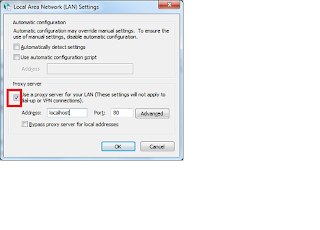
Let's move on to setting up the browser.

5.a. Go to Tools > Internet options > Change the proxy settings.


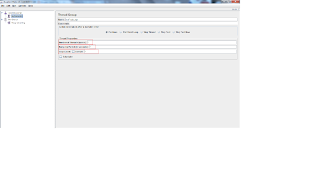
6.You can have a look at how the recorded script looks like


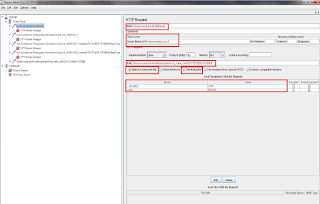
6.a Give a name to the http request.

6.b Server name will be grabbed here.

6.c Path will be recorded.

6.d By Default Follow Redirects will be checked,uncheck that & check the Redirect Automatically so that can help you in understanding how your request was redirected.

6.e Send Parameters will let you know what are the parameters that were passed on. automationwithselenium.blogspot.com-Google pagerank and Worth

Wednesday, November 23, 2011

JMeter - Superb Performance Test Tool

I have been working with JMeter from early days of JMeter 1.9 to date which is JMeter 2.5
Seen the tool evolve from just 4 samplers to a few listeners & much more flexbility now.

Apache JMeter is open source software, a 100% pure Java desktop application designed to (load) test functional behavior and measure performance. It was originally designed for testing Web Applications but has since expanded to other test functions.

Web Site: http://jakarta.apache.org/jmeter/index.html

License & Pricing: Open Source

Support: User mailing list (jmeter-user@jakarta.apache.org)

What can I do with it?
Apache JMeter may be used to test functional and performance both on static and dynamic resources (files, Servlets, Perl scripts, Java Objects, Data Bases and Queries, FTP Servers and more). It can be used to simulate a heavy load on a server, network or object to test its strength or to analyze overall performance under different load types. You can also use it perform a functional test on websites, databases, LDAPs, webservices etc.

JMeter is not a browser. As far as web-services and remote services are concerned, JMeter looks like a browser (or rather, multiple browsers); however JMeter does not perform all the actions supported by browsers. In particular, JMeter does not execute the Javascript found in HTML pages. Nor does it render the HTML pages as a browser does (it's possible to view the response as HTML etc, but the timings are not included in any samples, and only one sample in one thread is ever viewed at a time).

Installation

The installation of JMeter (if you would call it an installation) is pretty straight forward. On the website is a link to the download area of stable versions. You also have the possibility to use nightly builds, but this is at your own risk. No guarantee that they work properly. So the advice is always to start with a stable version.

Download the latest version (zip or tgz) and unpack the archive to a local folder. Before starting JMeter it is wise to have a look at the configuration. The jmeter.properties file (located in the bin folder) contains a lot of settings. Most of those settings should be fine for the average user. The file is well documented and easy to read (and change where needed).

Also pay attention to needed additional jars. If you are going to use for example JDBC, JMS or JavaMail additional jars are not included in the JMeter installation. The user guide on the website explains how to use it and where to get it.

Starting JMeter is just a matter of double clicking jmeter.bat in the bin folder.

Documentation

There is an extensive documentation on the web site. In all kinds of ways. User manual, Wikis, docs and user experiences. The user manual describes how to create specific testplans (Web, Database, JMS, Webservice, etc) including step by step instructions, examples, bitmaps and tips. Also additional information is described in the user manual like best practices, information about regular expressions and how to use the variables and predefined functions. And last but not least: the component reference describes in detail how every component can be used.

The principle of JMeter

The principle of JMeter is very simple. If you want to test e.g. a SOAP interface layer, all you basically need is the URL and SOAP request. Starting with that you can build your test plan. And this can be as fancy as you want. Using variables, counters, parameters, CSV files, loops, logs, etc. There are almost no limits in designing your test and making it as maintainable as possible. automationwithselenium.blogspot.com-Google pagerank and Worth

Monday, February 28, 2011

How to configure/change running other than on default port

Pogrammatically changing the default port.

RemoteControlConfiguration class which is contained in selenium-server.jar:

import org.openqa.selenium.server.RemoteControlConfiguration;

@Test

public void remoteControlConfigExample()
{
final int SELENIUM_PORT = 8888;
RemoteControlConfiguration rcc = new RemoteControlConfiguration();
rcc.setPort(SELENIUM_PORT);
SeleniumServer seleniumServer=null;
try
{
seleniumServer = new SeleniumServer(rcConfig);
seleniumServer.start();
} catch (Exception e)
{
e.printStackTrace();
}
Selenium selenium=null;
selenium = new DefaultSelenium("localhost", SELENIUM_PORT, "*firefox","http://www.google.com");
selenium.start();
//Add your piece of actions here & then followed by
selenium.close();
selenium.stop();
if(seleniumServer!=null)
{
seleniumServer.stop();
}
} automationwithselenium.blogspot.com-Google pagerank and Worth

Saturday, February 26, 2011

Selenium RC UI Mapping

Why should we map the Elements or identifiers or locators in UI?

Imagine that if you have a case with hundreds of input in login field. Now the login text box has been changed to drop down list or the name of the identifier has been changed from Textbox_Login to txt_login.

If we execute our existing test scripts they will fail as they cannot find the locator and making changes in all scripts that involve would be hard.

Hence we map the UI objects & store them in a centralized location for making the script more efficient and maintainable.

So we create a Properties file where we store all the UI objects identifiers & for any further changes we can just tweak this properties file as against all testscripts.

Create the properties file :

Create a file like resLogin.properties and we can assign the UI element as follows:

resuser.firstname = "ctl00_txtFirstName";
resuser.middlename = "ctl00_txtMiddleName";
resuser.lastname = "ctl00_txtLastName";
resuser.loginname = "ctl00_txtLoginName";
resuser.password = "ctl00_txtPassword";


All you have to do now is make a call in your selenium scripts.

For ex :

selenium.type("resuser.firstname","Shabana");
selenium.type("resuser.middlename"," ");
selenium.type("resuser.lastname","K");
selenium.type("resuser.loginname","autouser1");
selenium.type("resuser.password","welcome");

In the above example for any identifiers being changed you have to make changes in the properties file & replace the one highlighted. automationwithselenium.blogspot.com-Google pagerank and Worth

Types of Framework

Any framework is made up of a number of reusable modules & function libraries that are developed with the following characteristics in mind:

Maintainable
Reusable
Manageable
Accessible
Robust
Flexibility
Measurable


Frame work has several types and most popular are the below :

a.Keyword driven frame work
b.Data driven driven frame work
c.Hybrid framework

Key word Driven Frame work :

Keyword driven framework is an action based test method used in planing and implementation of automation.

Data Driven Framework :

Data driven is the design of possible inputs what may be given by the end user.
This would cover maximum probabilities of an input data.
It can either be Spread sheet(excel)/sql/CSV.
We have to connect and pass the values to the respective field or element.
The data should be designed by the experienced person on the project. It may be a client or even non technical person but should be more familiar from an end users prospective.
We have to map the file path properly.

Hybrid Framework:

The Hybrid Automation Framework is otherwise referred to in the industry as a "Hybrid Keyword Data Driven Automation Framework". automationwithselenium.blogspot.com-Google pagerank and Worth

Strategy to setup Selenium Framework Design

Its alwayz important to set the ground rules straight & think through these factors for designing a framework:

These are my views which has worked well in my past experience.

1. We need to create UI Map.

2. Libraries for UI objects.

3. Design classes based on application under test.

4. Plan for test execution approach to minimize the time.

5. Design report generation.

6. Prepare a Step table and step suite.

7. Prepare a Data set where ever needed.

8. Design Keyword Driven action fixtures this is purely on the approach we follow if its data driven framework ignore this step.

9. Design and develop the psudo code. automationwithselenium.blogspot.com-Google pagerank and Worth

Generate JUnit report with Ant & Eclipse IDE


Reports are crucial for any tests carried out.

Steps to configure and generate the test result from java eclipse using Ant:

this post is for users who have already familiar with java and eclipse.

Generating the ANT build:
Right click on the project and
select Export --> Ant Buildfiles.-->Next-->Select the project-->Finish.

Configuring jar:

Select Windows menu-->Preference -->Global Entries -->Add External JARs-->Select the folder where the eclipse is installed. eclipse -->Plugin -->Currently its located in "org.junit_4.8.1.v4_8_1_v20100427-1100"-->"junit.jar"-->OK.

Run the Ant Build:


Create a folder "junit" in side the project folder.

Right click on the AntBuildfile-->RunAs -->AntBuild

Return to java project and run as junit test.

End of test run you will find the test result in a html file named as index.html it will be stored inside the junit folder.
automationwithselenium.blogspot.com-Google pagerank and Worth

How to does selenium work with Tabbing

Key Press and Fire Event
Imagine that if you have a function in your application that can be invoked by pressing the "Tab" key.

Eg. Values being populated on focus out.

We can use keyPress with ASCII value for the key which you want to trigger the function.

Eg:
Command Target Value
keyPress Txt_Login \9


here "\9" is ascii value of horizontal tab.

Some functions may be used Onblur. It will trigger the function when the field looses the key focus.

We can use fireEvent with "blur" or "focus" command as follows:


Command Target Value
fireEvent Txt_Login blur automationwithselenium.blogspot.com-Google pagerank and Worth